
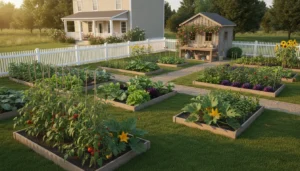
What Is Home Composting?
Home composting is the controlled decomposition of organic kitchen and garden waste into a nutrient-rich soil amendment. It reduces landfill waste and improves soil structure for potted plants and gardens.
This guide focuses on simple, low-cost methods you can use in a backyard, balcony, or even a small apartment.
Why Choose Home Composting
Composting saves money on fertilizer and reduces household waste weight. It also supports healthier plants by returning organic matter to the soil.
Even small efforts, like a kitchen caddy or a worm bin, contribute to measurable results over months.
How to Start Home Composting
Starting home composting is straightforward if you follow a few basic rules about materials, moisture, and aeration. Begin with the right setup and adjust as you learn.
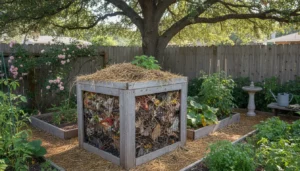
Choose a Compost Method
- Open pile or tumbler: Best for backyards with space and faster results.
- Compost bin: Contained, tidy, and good for small yards.
- Vermicomposting (worm bin): Ideal for apartments or small kitchens; uses red wiggler worms to process food scraps.
Add Browns and Greens
Balance is the key. ‘Greens’ provide nitrogen and include kitchen scraps and fresh grass clippings. ‘Browns’ provide carbon and include dried leaves, paper, and straw.
A good starting mix is roughly 3 parts browns to 1 part greens by volume. Adjust if the pile is too wet or too slow to break down.
Turn and Monitor
Aeration speeds decomposition. Turn a pile or rotate a tumbler every 1–2 weeks. In a worm bin, turning is not necessary; instead, gently mix the top layer occasionally.
Monitor temperature and moisture. Compost should feel like a wrung-out sponge and warm to the touch during active decomposition.
Materials to Use and Avoid
Use common household and yard materials, and avoid items that cause odors or pests.
Good Materials
- Kitchen: fruit and vegetable scraps, coffee grounds, tea bags (remove staples)
- Yard: grass clippings, leaves, non-treated wood chips
- Paper: shredded cardboard, paper towels (unbleached)
Materials to Avoid
- Meat, dairy, and oily foods (attract pests and create odors)
- Diseased plants or invasive weeds that can survive composting
- Pet waste from carnivores
Maintaining Your Home Composting System
Regular but light maintenance keeps compost healthy and productive. Weekly checks allow small problems to be fixed before they escalate.
- Moisture: Add water if dry, add browns if too wet.
- Airflow: Turn or fluff to introduce oxygen.
- Size balance: Chop large pieces to speed decomposition.
- Cover: Use a lid or tarp in rainy climates to avoid waterlogging.
Common Problems and Practical Fixes
Beginner composters often run into a few recurring issues. Here are simple diagnostic tips and solutions.
Problem: Bad Odors
Likely causes: too much green material, poor aeration, or meat in the pile. Fixes: add dry browns, turn the pile, remove offending items.
Problem: Slow Decomposition
Causes include insufficient moisture, lack of nitrogen, or large particle sizes. Fixes: moisten, add greens like vegetable scraps or grass clippings, and chop or shred materials.
Problem: Fruit Flies or Pests
Cover food scraps with browns, bury them deeper in the pile, or use a closed bin. For persistent pests, use a sealed indoor compost container or vermicompost method.
Compost can reduce household waste volume by up to 30 percent and speed up plant growth when mixed into garden soil at a 10 to 20 percent rate.
Small Case Study: Apartment Vermicomposting Success
Maria lives in a two-bedroom apartment and started a 10-liter worm bin under her kitchen counter. She added shredded cardboard and a coffee can of food scraps per week.
After six months she harvested dark, crumbly compost and used it to feed balcony herb pots. Her weekly trash weight dropped noticeably and she reported fewer grocery trips for fertilizers.
Practical Tips to Speed Success
- Chop or blend kitchen scraps to increase surface area and speed breakdown.
- Keep a small sealed indoor caddy to store scraps before transferring to the main bin.
- Use a thermometer if you want to monitor hot composting; 130–160°F indicates active breakdown.
- Rotate between two bins: one to be filled while the other cures for finished compost.
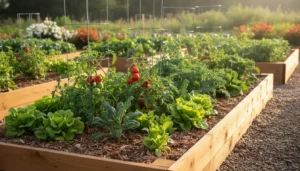
Using Finished Compost
Finished compost looks dark and crumbly and smells earthy. Mix it into potting soil, top-dress lawns, or blend into garden beds to improve structure and nutrient content.
Apply a thin layer (about 1 inch) around plants or mix 10–20% compost by volume into potting mixes for best results.
Next Steps for Home Composting
Start small, track what you add, and adjust the browns-to-greens balance as you go. Composting is flexible and forgiving, and skills improve with practice.
If you need a simple first step, set up a kitchen caddy and a small outdoor bin or a worm bin. Add materials, monitor moisture, and turn every week.
Home composting is a practical, low-cost way to recycle organic waste and build healthier soil. Begin with manageable steps, and you’ll see improvement in waste reduction and plant health over months.